| |
| Author |
Message |
janej363
Age: 40
Joined: 14 May 2009
Posts: 14
Location: USA


|
|
Pretty good video converters for both Windows and Mac users
Are you a video lover? Have you ever looked forward to searching for a satisfactory video converter to deal with your favorite video sources via Google, but have never met a nice one? If so, don’t be anxious, this guide will show you the detailed instructions of two excellent video converters, one for Windows, and the other for Mac. Just follow them and now let’s start.
Part 1: How to convert videos on Windows
1. Download Pavtube video converter, install and run it.
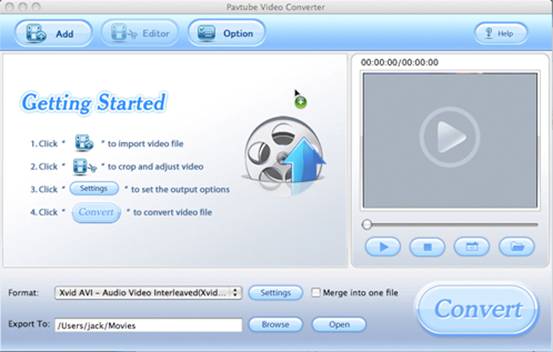
As soon as you have launched it, the following interface will show up.

2. Import video files, set output format and destination folder
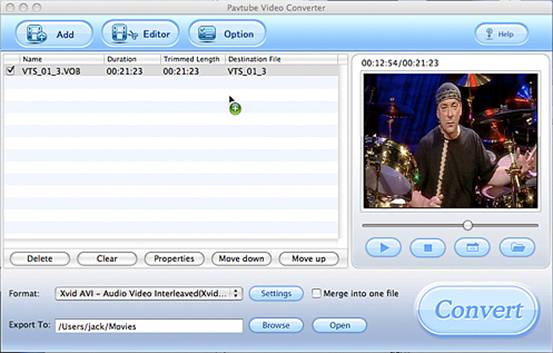
Click button “Add” to load the video files you want to convert from your PC. Then, you will see such an interface as below, you can click the drop-down list of “Format” to select the output format and press the output folder to decide where to place the resulted files. Moreover, if you want to combine multiple files into a single file, you can tick “Merge into one file”.

3. Set advanced settings
Suppose you are good at adjusting audio and video parameters, then you can press “Settings” to do this. You can reset all the items on the following window, like codec, bit rate, frame rate and so on.

4. Convert
After all the necessary settings are ready, you can click button “Convert” to start the conversion. Pavtube video converter can give you an estimated size of the final generated file, so that you can know if you have enough space to save the output files. Moreover, you will see it also shows you clearly how much time it has spent or how much time it will possibly cost to convert the rest part. The converting window is as below.

As soon as the conversion is completed, you can click “Open” to find out your generated files easily.
PS: Some more features of Pavtube Video Converter.
1. Audio and video match very well.
2. It supports to input various video/audio formats, even image formats.
3. Fast conversion speed with excellent quality.
4. Allow you add different sorts of watermarks, including text, images, GIF animations, videos.
5. Merge multiple files into one file.
6. Take place of the original audio with your specified audio.
7. It provides lots of special effects, like simple gauss blur, aged film, invert, flip color, gray and simple laplacian sharpen.
8. Its built-in codec will not install any codec on your computer, so as to avoid the unexpected codec problem.
Part 2: How to convert videos on Mac
1. Download Pavtube video converter for Mac, install and run it.
As soon as you have launched it, the following interface will appear.

2. Import video files.
Click button “Add” to load the video files you want to convert from your Mac. Then, you will see such an interface as below:

3. Set the output format and location.
Select the output format from the drop-down list of “Format”. Hit the button “Browse” to select the destination folder to load output files.

4. Convert
After all the necessary settings are ready, you can click button “Convert” to start the conversion. By the way, Pavtube has one more excellent feature that it can give you an estimated size of the final generated file, so that you can know if you have enough space to save the output files. The “Ripping” window is as below.
[img]http://www.pavtube.com/video-converter-mac/guide/how-to-convert-videos-with-video-converter-for-mac_clip_image007.jpg [/img]
Tips:
How to replace the original audio of your video files on Mac?
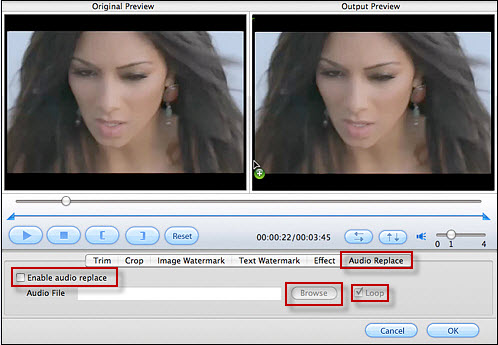
Press icon “Editor”, and then click button “Audio Replace” in the pop-up window. After that, an interface as following will appear. Hit the checkbox “Enable audio replace” and click “Browse” to specify which audio file will be selected to displace the original one. In addition, if the audio file you selected is not as long as the original, you need click checkbox “Loop” to let it restart from beginning, otherwise the rest video will be left without sound as soon as the audio you specified ends off in the first round. Remember, as soon as your setting is done, click “OK” to apply it.

Once the conversion is done, you will get an amazing video file with certain special background sound which is totally directed by yourself.
|
|
|
|
|
|
  |
    |
 |
harvey438
Joined: 02 Jun 2009
Posts: 127


|
|
How to convert video files via VFW codec?-DivX codec is also referred
In principle, all the video converters in the market have their own built-in codec, while sometimes users do not want to use these native codec, but rather use a codec purchased from third party or developed by themselves. For users have this kind of needs, my article will take VFW codec for instance, and aims to introduce you how to transfer your video files with VFW codec via Pavtube Video Converter.(Meanwhile, DivX codec will be mentioned in a certain part of this article, if it is what you are looking for, just do not miss it.)
First of all, we’d better have a brief understanding of VFW. VFW is short for Video for Windows, which is an early Windows video codec format first introduced in November 1992, and has been in use ever since. It is installed on Windows system, and usually used in AVI format, and can be seen by all application programs, so that it allows software developers working on the Windows platform to add the ability to play or manipulate videos to their own applications.
Well, now, let’s move on with the process of converting video files with VFW codec through Pavtube Video Converter.
Once you have launched this program, add your video files to it, and then select “Common video” in the drop-down list of “Format”, after that opt for an AVI format, please pay attention, only AVI format here allows you using VFW codec to encode your files.

Afterwards, click “Settings”, the following interface will pop up. Check a VFW codec for your files, here I choose IR45 for example.

As soon as you have chosen a VFW codec, you will find that some parameters like bit rate, frame rite showed on the following window are disabled, at this time you can click “Config” to set your encoder settings.

After clicking “Config”, you will see the interface below, and set the parameters on it according to your own requirements. If you are insightful enough, you may have found this VFW codec does not support changing bit rate or frame rate, so let it go, and just do what you are permitted.

Okay, that’s all about setting video parameters; next, I’ll talk about how to amend video images if they are reversed during the course of encoding. This issue often occurs when the output image pixels of Pavtube Video Converter are inconsistent with the ones that the encoder requires. Take it easy, we can use image reversal function to fix it: flip the videos from left to right or up to down, until they are coincident.

By the way, for more and more people wanna use DivX codec to encode HD videos, here I’d like mention something about it. Actually, the steps of using DivX codec to encode videos via Pavtube are as simple as that of VFW. In the first place, you should have a DivX codec installed on your PC, if not, please download from this link: http://www.divx.com/en/downloads/divx/win. In addition, one more point must be emphasized that the same with VFW codec, to enable DivX codec available, you have to set the output format as AVI, otherwise, you can not find out the DivX codec. In the identical access as VFW, by pressing button “Settings”, you are able to go into “Profile” panel, and get hold of DivX codec.

Also, when it comes to video parameter setting, bit rate and frame rate can not be adjust in the following window, so you have to go to “Config” to reset them.

Enter “Config”, this interface will appear, you can change rate control mode and bite rate here, or press tags like “Codec”, “Video” to set other parameters inside them.

All right, you see, as long as you have made a correct choice of an appropriate video converter, change video codec from one to another while video transferring is like taking candy from a baby. Hooray! My post is ending up now, seems lots of words and pictures; hope they do no dazzle your eyes and can be absolutely helpful, do not waste my mental efforts as well.
|
|
|
|
|
|
| |
    |
 |
ipodmanager99
Age: 42
Joined: 14 Jun 2009
Posts: 71


|
|
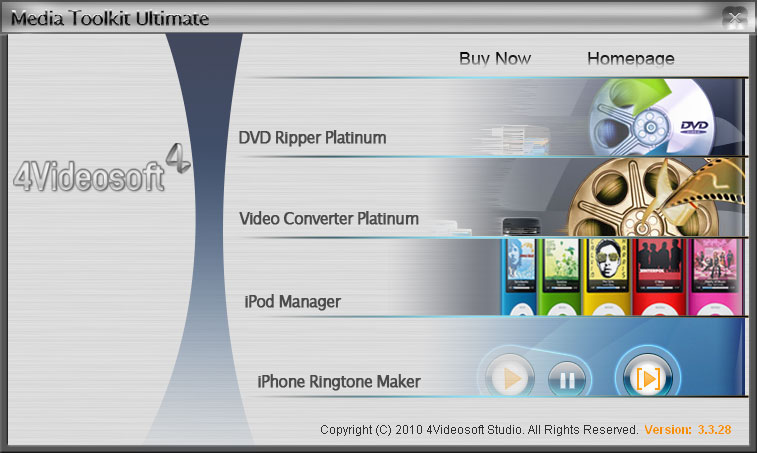
4Videosoft Media Toolkit Ultimate features four powerful media software: 4Videosoft DVD Ripper Platinum, 4Videosoft Video Converter Platinum, 4Videosoft iPod Manager , 4Videosoft iPhone Ringtone Maker.

Key Functions
Combines DVD Ripper Platinum
4Videosoft Media Toolkit Ultimate helps you rip DVD to AVI, MP4, MPEG, MOV, 3GP, MP3, AAC, etc.
Pack Video Converter Platinum
4Videosoft Media Toolkit Ultimate is one comprehensive video convertor to convert video for iPod, iPhone, PSP, Zune, Creative Zen, etc.
Unite iPhone Ringtone Maker
4Videosoft Media Toolkit Ultimate unites the function to create M4R ringtone from video/audio source.
Collect iPod Manager
4Videosoft Media Toolkit Ultimate collects the solution to backup iPod videos/audios to Computer, import your computer files or folder to iPod, even between iPhone, and between iPods.
Most complete HD solution
4Videosoft Media Toolkit Ultimate owns the most complete HD solution to convert HD video to HD video, HD video to SD video, SD video to HD video.
Output videos/audios, DVDs to most potable players
4Videosoft Media Toolkit Ultimate can output videos/audios to iPod, iPhone, Sony PSP, Microsoft Zune, Creative Zen, Wii, Xbox, Sony Walkman, Archos, iRiver, BlackBerry, Sony Ericsson, Mobile Phone, etc.
|
|
|
|
|
|
  |
    |
 |
wts30286
Joined: 06 Nov 2012
Posts: 45130


|
|
| |
    |
 |
|
|
|
View next topic
View previous topic
You cannot post new topics in this forum
You cannot reply to topics in this forum
You cannot edit your posts in this forum
You cannot delete your posts in this forum
You cannot vote in polls in this forum
You cannot attach files in this forum
You cannot download files in this forum
|
|
|
|