| |
| Author |
Message |
arthurking
Age: 39
Joined: 22 Jun 2009
Posts: 781


|
|
Many Mac users want to enjoy their favorite DVDs and Videos on the portable devices, but they just do not know how, so this article is created to show how to put DVDs and convert Videos on Mac OS X
What you need are Wondershare DVD Ripper for Mac and Aiseesoft Video Converter for Mac.
It includes two parts
Part 1: How to rip DVDs on Mac OS X to put on portable devices
Part 2: How to convert Videos on Mac OS X to put on portable devices
Part 1: How to rip DVDs on Mac OS X to put on portable devices
Step 0: Download and install Wondershare DVD Ripper for Mac (Intel Version) or (Power PC Version).
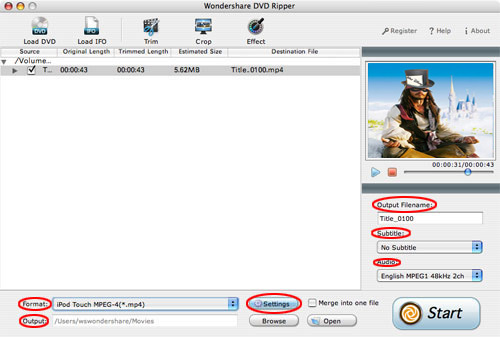
Step 1: Import DVD Movies
1. Click the "Load DVD" button, select the folder of your DVD movie, and click OK. If the movie is on your disc drive, you can just select the drive and click OK.
2. Or click the "Load IFO" button, open the folder of your DVD movie, and you will find two folders in it: AUDIO_TS and VIDEO_TS. Open the VIDEO_TS folder, select all the IFO files, and then click OK.
After the movie is loaded, you can see all the chapters and titles in it, and then you can check the ones you want to convert. If you want to convert the whole movie, you can just keep all the titles or chapters checked.
Step 2: Output Settings
After your DVD movie is loaded, you can start to set output settings:
1. Select an encoder type from the format drop-down list according to the device you want to put the video on.
2. Click the "Settings" button to set the video and audio parameters.
3. Name each title/chapter in the "Output Filename"field, and select the suitable subtitle and audio track for the titles/chapters if you want.

Note:You can check the "Merger into one file" option to join all the selected DVD titles/chapters into one file instead of creating a separated file for each title/chapter.
Step 3: Click the "Start" button to start the conversion.
All you need to do now is to wait for the conversion to be finished. The remaining time will be shown on conversion window for your reference.
Some Tips:
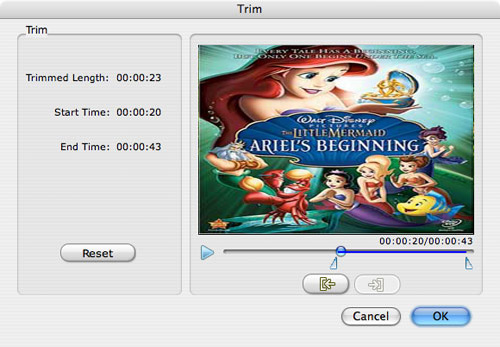
1. Trim Movie
If you just want to convert a clip from your DVD movie, you can click the Trim icon to capture a clip. In the Trim window, you can trim the length of the current title/chapter by either dragging the Start Time and End Time sliders or setting the time parameters in each corresponding field.
2. Crop Video
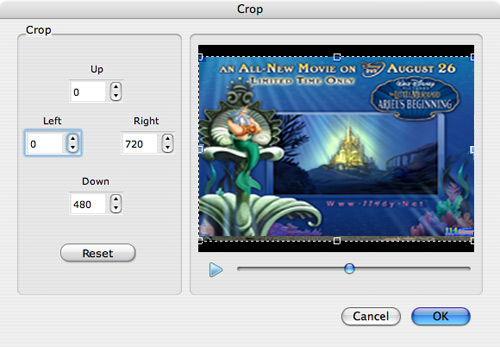
If your DVD video has black sides, you can use this Crop function to remove them. Click the Crop icon to open the Crop window, and set the video crop area by dragging the crop frame or setting the four crop parameters (Top, Bottom, Left and Right).
3. Movie Effect
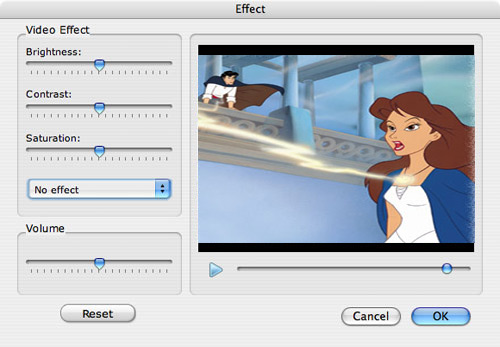
If you want to change the original video effect, you can click the Effect icon to set the video brightness, contrast, saturation, and even audio volume. You can also choose to apply a special effect to your movie video from the available effects including Gray, Emboss and Negative.
Part 2: How to convert Videos on Mac OS X to put on portable devics
Step 0: Download and install Aiseesoft Video Converter for mac(Intel Version) or (Power PC Version)
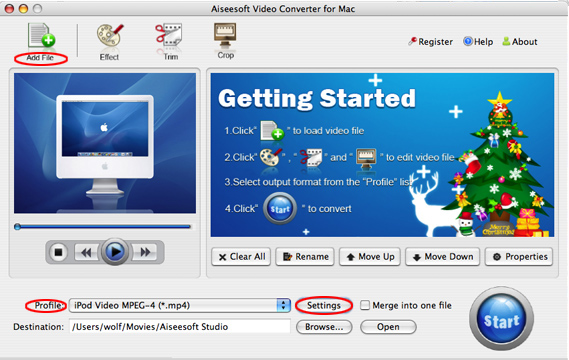
Step 2: Click "Add File" to load your video sources.
The supported input formats includes: MPG, MPEG, MPEG2, VOB, MP4, M4V, RM, RMVB, WMV, ASF, TS, MKV, AVI, 3GP, FLV, MPV, MOD, TOD, MP3, MP2, AAC, AC3, WAV, MID, MIDI, WMA, M4A, RA, RAM.
Step 3: Set the output formats, specific parameters and destination by click the drop-down arrow of “Profile” to choose the exact output format
Step 4: Click "Start" button to begin the conversion. The conversion speed can reach up to 300%, in a short while the conversion will be finished.
More editing functions:
1. Effect:
Click "Effect" button to open the effect window.
It allows you to edit your movie’s effect including "Brightness, Contrast, Hue, Saturation and Volume".
2. Trim:
Click "Trim" to open the trim window.
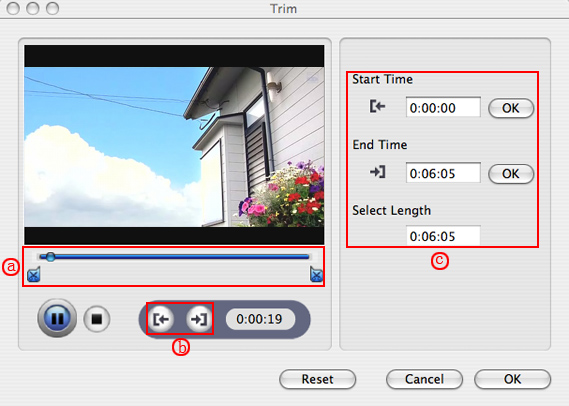
There are three ways to trim the convertered video, just as the label a, b, c showing in the picture.
3.Crop:
Click "Crop" to open the crop window.
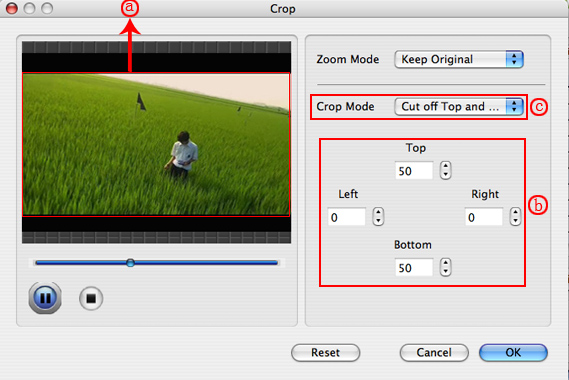
There are three ways to set the crop mode, just as the label a, b, c showing in the picture. There is also Zoom Mode to fit for your player screen.
4.Merge into one file
Pick the files that your want to join, Pick "Merge into one file". After conversion, these separated files are be joined into one file.
Now you can easily enjoy your DVDs and Video on your portable devices, so what are you waiting for? Just try this and have a colorful digital experience!
Mac Video Converter
|
|
|
|
|
|
   |
    |
 |
ipodmanager99
Age: 42
Joined: 14 Jun 2009
Posts: 71


|
|
4Videosoft Media Toolkit Ultimate features four powerful media software: 4Videosoft DVD Ripper Platinum, 4Videosoft Video Converter Platinum, 4Videosoft iPod Manager , 4Videosoft iPhone Ringtone Maker.
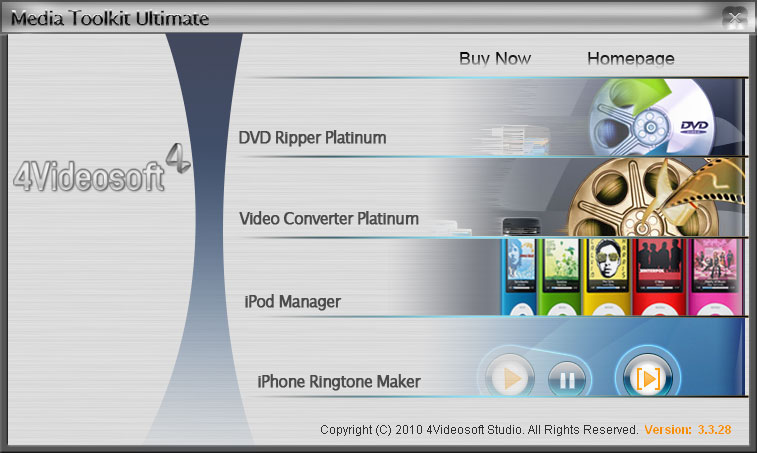
Key Functions
Combines DVD Ripper Platinum
4Videosoft Media Toolkit Ultimate helps you rip DVD to AVI, MP4, MPEG, MOV, 3GP, MP3, AAC, etc.
Pack Video Converter Platinum
4Videosoft Media Toolkit Ultimate is one comprehensive video convertor to convert video for iPod, iPhone, PSP, Zune, Creative Zen, etc.
Unite iPhone Ringtone Maker
4Videosoft Media Toolkit Ultimate unites the function to create M4R ringtone from video/audio source.
Collect iPod Manager
4Videosoft Media Toolkit Ultimate collects the solution to backup iPod videos/audios to Computer, import your computer files or folder to iPod, even between iPhone, and between iPods.
Most complete HD solution
4Videosoft Media Toolkit Ultimate owns the most complete HD solution to convert HD video to HD video, HD video to SD video, SD video to HD video.
Output videos/audios, DVDs to most potable players
4Videosoft Media Toolkit Ultimate can output videos/audios to iPod, iPhone, Sony PSP, Microsoft Zune, Creative Zen, Wii, Xbox, Sony Walkman, Archos, iRiver, BlackBerry, Sony Ericsson, Mobile Phone, etc.
|
|
|
|
|
|
  |
    |
 |
scofield119
Joined: 13 Jun 2008
Posts: 139


|
|
"How to rip DVD to AVI, MPEG, MPEG-4, WMV, MOV, DivX, ASF video on Mac?
The tool I suggest you use is DVD Ripper for Mac
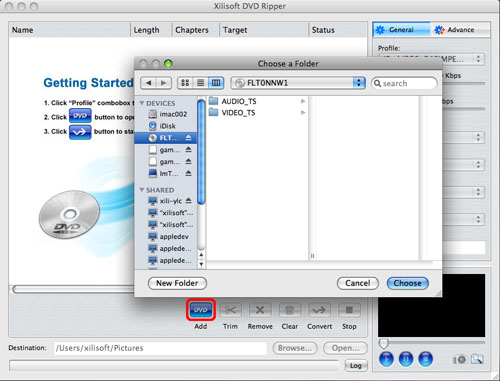
Step 1: Load DVD to the program
Insert DVD into your DVD-ROM, run DVD Ripper for Mac, and then the DVD ripper will load the DVD automatically.
You can also click the ""Add"" button to load DVD disc, DVD folder or DVD image (IFO file).
Step 2: Set the output format
After loading the DVD, choose the titles or chapters you want to rip, and then select the profile from the ""Profile"" drop-down list in the ""General"" tab on the right panel.
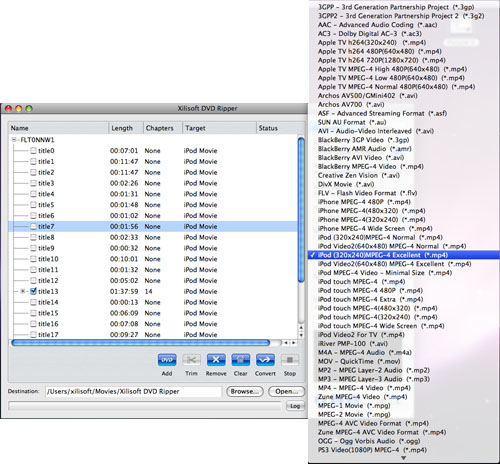
Tip1: After choosing a profile, you can adjust parameter values in the ""Advance"" tab, such as ""Bit Rate"", ""Sample Rate"", ""Duration"", ""Start time"", etc.

Tip2: You can preview the source file via the built-in player in the preview window right below and also take a snapshot when previewing by clicking the ""Capture Frame"" button.
Tip3: If you just want to convert a segment of a video, you can use the ""Trim"" function.
Step 3: Set the output file destination and file name
You can click the ""Browse"" button to choose the path where you want to save the output files or just keep the default path; you can specify the output file name in the ""Output filename"" textbox.
Step 4: Start conversion
After everything is OK, click the ""Convert"" button to start ripping.
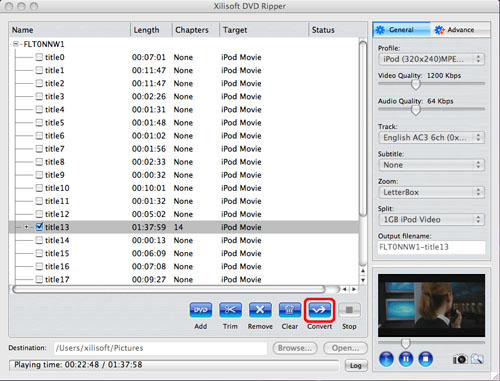
When the conversion is completed, you can click the ""Open"" button at the bottom of the main interface to browse the output files.
"
|
|
|
|
_________________
A wanderer who is determined to reach his destination does not fear the rain.
|
|
| |
    |
 |
wts30286
Joined: 06 Nov 2012
Posts: 45130


|
|
| |
    |
 |
|
|
|
View next topic
View previous topic
You cannot post new topics in this forum
You cannot reply to topics in this forum
You cannot edit your posts in this forum
You cannot delete your posts in this forum
You cannot vote in polls in this forum
You cannot attach files in this forum
You cannot download files in this forum
|
|
|
|