| |
| Author |
Message |
april347
Age: 43
Joined: 06 May 2009
Posts: 1120


|
|
This guide shows you how to rip DVD to MP4, AVI, MP3, WMV, WMA, FLV, MKV, MPG, RM, 3GP, etc by using Aiseesoft DVD Ripper
Step 1: Install and run Aiseesoft DVD Ripper
Step 2: Import DVD.
Place the DVD into your DVD drive and click the “Load DVD” button to load DVD.
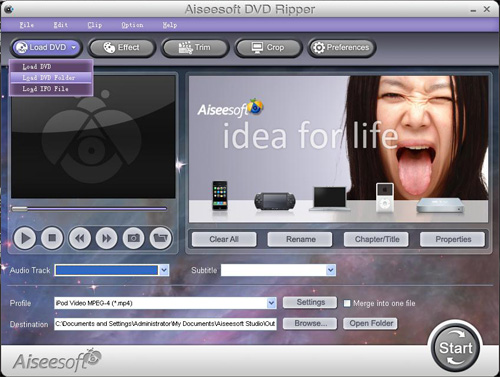
Tips: This DVD Ripper can load three DVD source, you can load your DVD from DVD drive, DVD folder in your PC and also IFO file.
Step 3: Video settings.
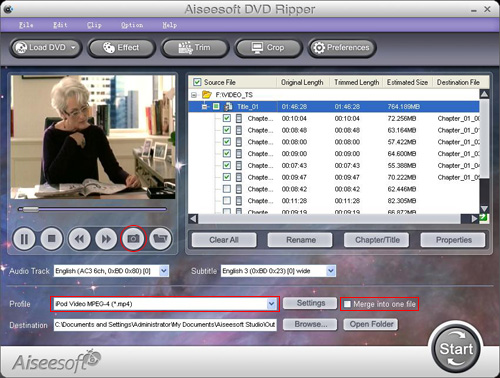
Select the output video format you want from the “Profile” drop-down list.
Tips:
1: You can also select Audio Track and Subtitle from their respectively drop-down list.
2: You can click the “Settings” button to set your video parameters.

In the Video Settings, you can select Encoder, Frame Rate, Resolution and Bitrate for your movie
In the Audio Settings, you can select Encoder, Channels, Bitrate and Sample Rate for your movie.
when you choose the specific settings, the lower window will show the "help" to explain the meanings of each setting.
Step 4: Start conversion
Click the “Start” button to start your conversion and in a short while it will be finished.
Step 5: Click “Open” button to open your output destination file.
More tips:
1: Trim Movie
If you just want to convert a clip from your DVD movie, you can click the “Trim” button to open the Trim dialog, you can trim a duration of the selected title or chapter by either dragging the Start Time and End Time sliders or setting the time parameters in each corresponding field.
After you set the trimming time, the length of the captured clip will be shown in the Select Length box for your reference.

2. Movie Effect
If you want to change the original video effect, you can click the Effect icon to set the video brightness, contrast, saturation, etc. You can also set the special effect for your movie to cater to your need.

|
|
|
|
|
|
   |
    |
 |
informationspy
Joined: 09 Jun 2008
Posts: 246


|
|
"
Now I would like to introduce you a Good DVD Ripper named Xilisoft DVD Ripper . Here is the web for you to follow :
http://www.xilisoft.com/dvd-ripper.html
""Xilisoft DVD Ripper Ultimate is powerful and easy-to-use DVD ripping software with the ability of ripping DVD to almost all video and audio formats. With its powerful compatibility for iPod, iPhone, PSP, Apple TV, etc., Xilisoft DVD Ripper Ultimate enables you to rip DVD to various portable media players supported formats.
Additionally, it can help you clip DVD segment, crop DVD size, edit DVD effects, adjust subtitle, and add DVD watermark, to get the customized DVD video and audio files.
This tutorial includes 3 parts. Hope useful for you!
1. Step by step guide;
2. Clip video segments;
3. Edit video effects.
Step by Step Guide
1. Start Xilisoft DVD Ripper Ultimate and Add DVD
Click """"Open DVD"""" button, select a DVD (or DVD Folder, ISO file, IFO file) in the dialog box that opens, and load it. The Loaded DVD’s information, such as chapter, title, etc., will be shown in the file list.
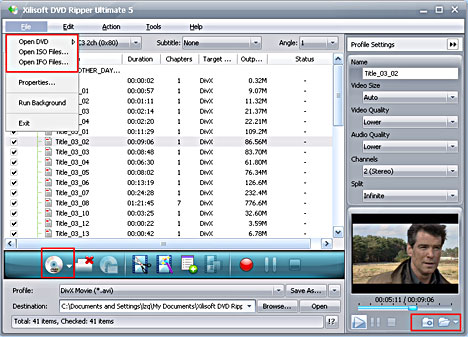
Tip1: Get DVD information.
After loading DVD, if the network is connected, click Get Disc info button in the toolbar, or click Edit>Get Disc Info in the menu, the software will retrieve loaded DVD information from Web database, and display the information in the file list, such as title name and chapter name.
Tip2: Take snapshot.
Select a video file in the file list, click Play button in the video preview window. When the video jumps to the image you like, click Snapshot button, to store the image in the snapshot folder.
You can set the snapshot folder by yourself. To do this, click Config snapshot folder from Settings drop down list, select the snapshot folder you want in the dialog box that opens.
2. Select output format
Select one or more files in the list, click Profile drop-down button, select an output format for selected files in the drop down list that opens.
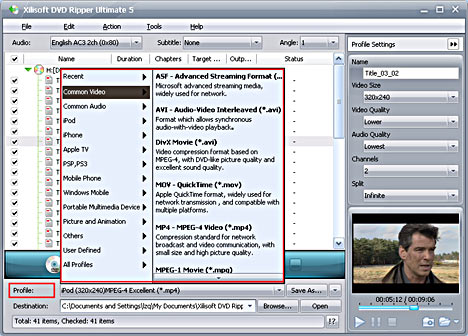
Tip1: To adjust output settings, you can set the detailed parameters of output format in the profile panel of right window.
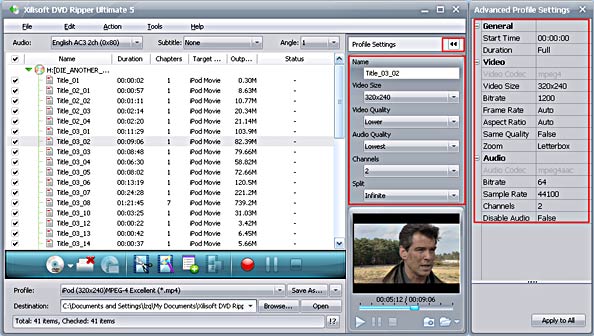
Tip2: Set multiple output formats for one file.
The software supports to output multiple files with different formats for one video. To do this:
1. Select a file in the file list.
2. Select an output format in the Profile.
3. Click Add profile button, the software will create a profile directory under the selected file automatically.
4. Select a new profile, click profile dropdown button, and select a new output format from the list.
Tip3: Custom output size.
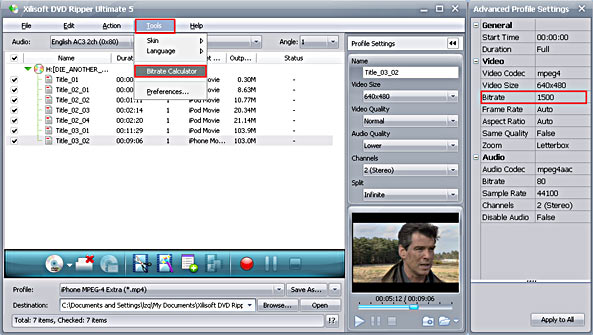
The software provides customizing the size of the output file.
To do this, please click Tools>Bitrate Calculator to open Bitrate Calculator dialog box, select a file size you want, or enter the file size in the textbox directly.
Meanwhile, you can also set audio bit rate and video bit rate in this dialog box.
Tip4: Merge the files in the file list
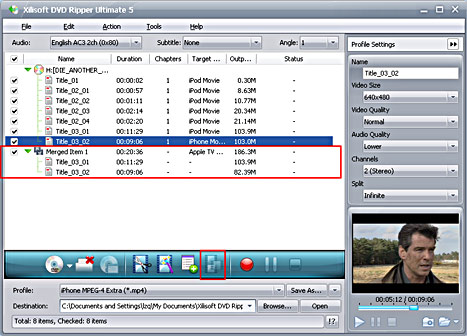
The software supports merging various video files in the file list into one and then ripping to one file.
To do this, please check all files needed to merge in the file list and click Merge button on the toolbar, all selected files will be merged into one file and added to the file list.
3. Set output folder
Click Browse button in setting panel, select a destination folder in the dialog box that opens, and click OK.
4. Extract file
After finishing the above settings, check the needed file to extract in the file list, click Start Ripping button on the main interface, to start extracting the file. You can view the progress of the extracting process from the progress bar at the bottom of the window.
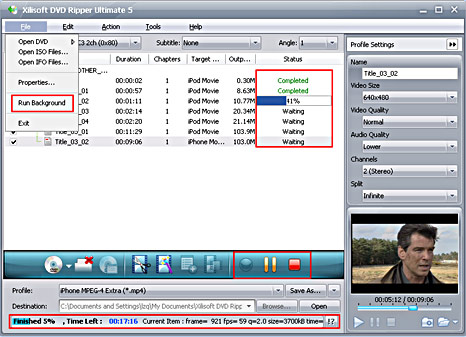
Tip1: You can click Pause Ripping button to pause the extracting process and Stop Ripping button to cancel the process as required.
Tip2: You can choose to run it background at File> Run Background.
Clip Video Segment
Xilisoft DVD Ripper Ultimate provides video clipping function, which allows you to choose the segments you like from the source video, and add them to the file list.
Select a video file in the file list, click Clip button in the toolbar to open Clip window, and start to edit the video.
You can clip the original video into several parts, then convert and output them separately or as a whole one.
Check the video and click the """"Clip"""" button, clip interface will come up.
Set start point and end point, you get the segment you want to convert and output.
Click the """"New Clip"""" to get more segments if you need.
Check the """"Output segments as a whole one"""" box below and the segments will be output as whole one. Otherwise they will be output separately.
Tips:
Segment list displays all segments that are needed to output, including the start time, end time and length.
Check Output segments as whole one option to merge the segments in the list into one video to output.
Edit Video Effects
Xilisoft DVD Ripper Ultimate provides multifunctional video effects editing tools, which can not only help you crop the picture and adjust subtitle, but also support changing video effect and creating video watermark.
Click Effects button to open Effects window.
1. Crop picture
Click Crop button in the left Effects window to open crop setting page.
You can set crop area and its position here.
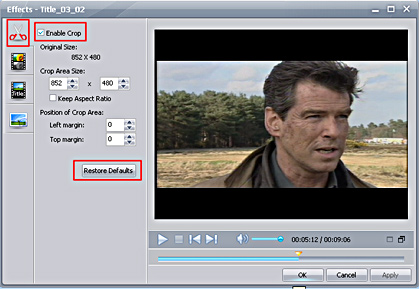
Tips:
Click Restore Defaults button, to restore the default settings.
Adjust crop area manually: drag the central handle and surrounding handles to adjust the crop area.
2. Add effects
Click Effects button to open Effects window, and click Effect button in the left Effects window to open effect settings page, and then change the effect.
You can set Brightness, Contrast and Saturation here, or add other effects from the Other Effects drop down list.
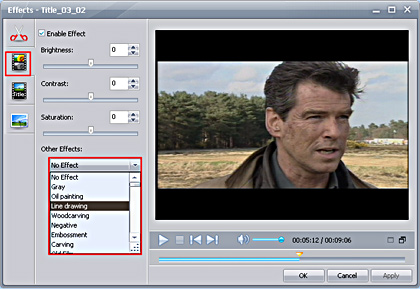
Tip: Click Restore Defaults button, to restore the default settings.
3. Adjust video subtitle
Click Effects button to open Effects window. Click Subtitle button in the left Effects window to open subtitle setting page, and then adjust the subtitle style of the video.
You can set Transparence, subtitle Vertical Position and Font Style here.
Tips:
Click Restore Defaults button, to restore the default settings.
Adjust the vertical position of the subtitle: drag the horizontal line displayed on the subtitle up and down, to set the vertical position of the subtitle.
4. Create video watermark
Click Effects button to open Effects window, and click Watermark button in the left Effects window to open watermark setting page. And then check Enable Watermark check box and add watermark for the video.
Tips:
Click Restore Defaults button, to restore the default settings.
Adjust watermark position manually: drag the vertical & horizontal line displayed on the watermark to set the vertical position of the watermark.
5. Compare and preview the source video and destination video
You can preview the effect of the destination video after adding effects for the video.
Moreover, the software supports comparing and previewing the source video and destination video, which enables you to easily adjust the effect of the destination video by comparing.
1. Select a file, click to open the Effects window, and then add effects for the selected video.
2. Click Comparison View button in the preview panel, then the source video and destination video will be played at the same time in the preview win"
|
|
|
|
_________________
One lies makes many!
|
|
| |
     |
 |
ivy00135

Joined: 06 Nov 2012
Posts: 49808


|
|
| |
    |
 |
Jasonx
Joined: 08 Jan 2013
Posts: 119


|
|
|
In my opinion, the best hair tools are Babyliss Pro. It is proved reasonably that Babyliss Pro Hair Dryer own newest and highest technoligy for protect hair from damaging while one is making hairstyle. As the most popular hair tools, there is professional work with to attain incredible locks will include everything from Babyliss Pro Flat Iron.
|
|
|
|
|
|
| |
    |
 |
|
|
|
View next topic
View previous topic
You cannot post new topics in this forum
You cannot reply to topics in this forum
You cannot edit your posts in this forum
You cannot delete your posts in this forum
You cannot vote in polls in this forum
You cannot attach files in this forum
You cannot download files in this forum
|
|
|
|