style197
Age: 39
Joined: 15 Apr 2009
Posts: 352
Location: America


|
|
How to convert M4V to MPEG for edit in iMovie?

iMovie is an useful and powerful tool for Mac users. You can bring video into iMovie from a variety of sources and devices so as to organize, catalog and edit the video, then share your movies with friends and family on the web, Mac or portable devices easily. However, you can not edit all the videos in iMovie. Today you can use a multiple of video devices to shoot video and get even more from web, which are in various formats. Although iMovie works with the emerging generation of video recording devices, there are some formats that are not supported. M4V is one of the few formats that iMovie will not work with. You have to convert M4V files to iMovie compatible format before you can import them to the software. This guide aims to shows how to convert M4V files to MPEG which is compatible with iMovie. Please find a step-by-step guide below.
In order to convert M4V files, you need a Mac Video Converter. And I recommend you Pavutbe Video Converter for Mac, which not only converts among versatile media formats, but also allows you to set video codec, bit rarte, frame rate, resolution, audio codec, sampling rate, channels, etc.
Step One. Load source files.
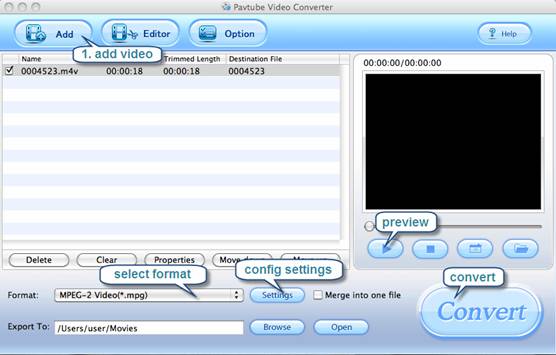
Run Video Converter for Mac and click on “Add” to import M4V files, browse to source video folder and click “Choose”. In preview window you could view the video and take snapshots. When the box of Merge into one is checked, all selected videos will be combined together as one output file after conversion.

(Tip: you can click “Edit” button to perform edit functions such as crop, trim, flip, effect, watermark and audio replace. To eliminate interlacing effect, simply check Deinterlacing box under Effect tab.)
Step 2: Set Output format.
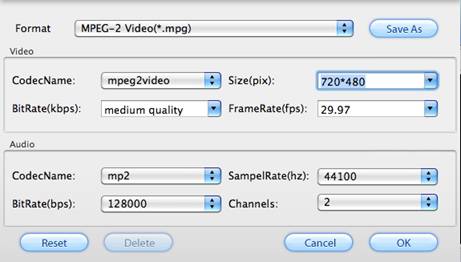
Click on “Format” bar when you’d like to specify an output format. As iMovie supports MPEG-2, MPEG-4, AVCHD, DV and QuickTime format, you may select Common Video-> MPEG-2/ MPEG-4. MOV format is an alternative choice for your preference. If you want to further customize video and audio parameters such as video codec, audio codec, frame rate, bit rate, video size, audio channels etc, please click “Settings” to cofig them. Do not forget to click on “OK” to confirm your settings. In Export to box you could specify destination for the converted file.

Step 3:Start converting M4V to MPEG.
Click on “Convert” button to start Conversion. The converter will generate MPEG file with admirable video quality. After converting M4V to MPEG you can edit the converted files in iMovie freely. See how to edit video in iMovie.
|
|
|
|
|
|
Tech Guy
Joined: 10 Jul 2022
Posts: 8


|
|
If you are using a Mac computer or laptop and have lost or deleted your photos, you can make use of this Mac photo recovery software. It provides an easy-to-use, dependable option for accomplishing digital media retrieval on a Mac or external device like USB and flash drives, SD/CF and memory cards. After watching this highlighted video tutorial, you can easily retrieve lost, deleted, or corrupted media regardless of how the information was removed. This Mac photo recovery software will locate individual media types or all available data for easy restoration. It may be used on higher capacity drives to recover several types of media and to create images of your attached storage media.
Quick action ensures the best results as waiting too long could cause the photos to be irretrievable. Simply complete these steps for to use Mac photo recovery software:
1. Start a new scan.
2. Choose the drive.
3. Configure the recovery mode.
4. Scan a media source.
5. Pick your photos.
6. Recover selected photos.
|
|
|
|
|
|