| |
| Author |
Message |
style197
Age: 39
Joined: 15 Apr 2009
Posts: 352
Location: America


|
|
Reserve TrueHD audio of BD .m2ts files on Mac
Are you feeling headache to figure out a way to reserve Dolby TrueHD audio of your Blu-ray .m2ts streams while doing format conversion?
Without a practical program, it’s definitely difficult to set the movies being converted in your master language, even though your .m2ts files
are not copy-protected. Normally, if your master language is English, then English audio is making use of TrueHD, and suppose your format
conversion application can not recognize TureHD audio, then it will only output the audio track it recognized, that would be French, Spanish,
or some other languages instead of English. In that case, you will encounter language troubles absolutely, so an available MTS/M2TS converter
which can support TrueHD audio would provide timely help at this time. To relieve the pains of Mac users, this guide will show you how to
retain TrueHD audio of BD .m2ts files on Mac in detail.
Required software:
Pavtube MTS/M2TS Converter for Mac
Okay, now let’s start.
Step 1: Click "Add" button to load .m2ts files

Step 2: Click "Properties" to select TrueHD audio
Firstly, click the drop-down list of "Stream ID", after that a list of audio tracks will show up like "0x1100", at the same time, the audio
codec name will pop up in the textbox of "Format", if it is TrueHD, the codec name "truehd" will emerge like the following interface showing.
What you should do is just clicking on the stream ID one by one to see which one is your wanted TrueHD audio.

Step 3: Select output format and set destination folder
Click the drop-down list of "Format" to select whatever format you like as output format, and click "Browse" button to specify where to store
the output files. Meanwhile, if you want to combine multiple .m2ts files to be as a single file, you can tick the checkbox "Merge into one
file".
Step 4: Set advanced settings
Click "Settings" button, and you are allowed to adjust audio and video parameters like codec name, aspect ratio, bit rate, frame rate, sample
rate, and audio channels in the following interface, to reserve TureHD audio to the full extent, you should select 6 channels.

Step 5: Click "Convert" button to begin conversion
After conversion is completed, the output files can be found out via clicking "Open" button with ease.
BTW, if you do not have decrypted BD .m2ts streams, but copy-protected Blu-ray discs, then [url=http://www.pavtube.com/blu-ray-ripper-mac/]
Pavtube Blu-ray Ripper for Mac[/url] is your appropriate choice, it is also able to deal with Dolby TrueHD audio an
|
|
|
|
|
|
   |
    |
 |
youhowbz
Age: 38
Joined: 07 Jan 2010
Posts: 674


|
|
Nokia is engaged in the manufacturing of mobile devices and in converging Internet and communications industries. A lot of people choose Nokia as their communication tools. With the development of technology, Nokia offer more functions for its users, such as MP3 function, Video function. Some people know how to put videos on it, some not. In the following text, I will show everyone who has a Nokia and want to enjoy videos on their players.
I divide this article into two parts:
1. How to put dvd on Nokia
2. How to put video on Nokia
To complete this process, I need a tool called 4Videosoft DVD to Nokia Suite
Part 1: How to put dvd on Nokia with DVD to Nokia Converter
Step 0: Download and install 4Videosoft DVD to Nokia Converter
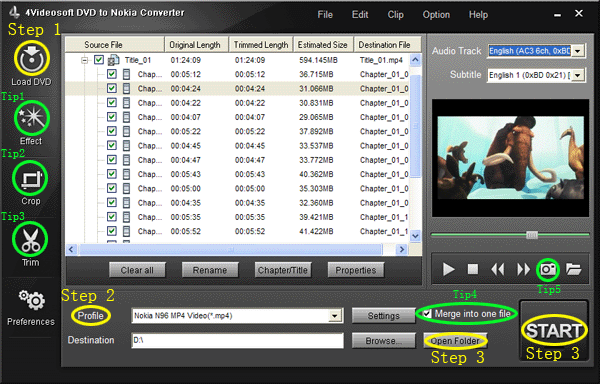
Step 1: Import DVD.
Place the DVD into your DVD drive and click the “Load DVD” button to load DVD.
Step 2: Video settings.
Select the output video format you want from the “Profile” drop-down list.
Step 3: Place video
Click “Open Folder” button to open your output destination file.
Step 4: Start conversion
Click the “Start” button to start your conversion and in a short while it will be finished.
Part 2: How to put video on Nokia with Nokia Video Converter
Step 0: Download and install 4Videosoft Nokia Video Converter
When you finished the download process, run the .exe file to install it.
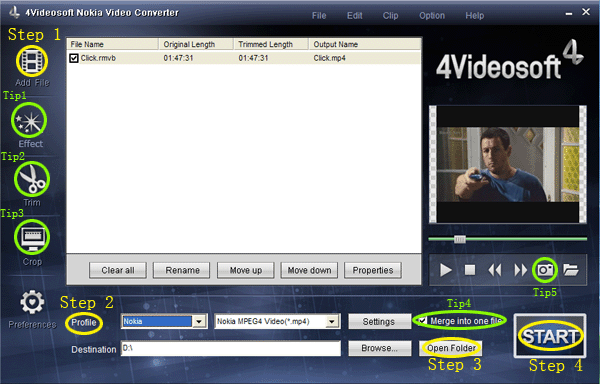
Step 1: Click “Add files” button to import videos.
Step 2: Extend the "Profile" category to select an output format.
Step 3: Click “Open Folder” button to open your output destination file.
Step 4: Click the “Start” to convert.
Tips----- Basic functions for all the 4videosoft:
1. How to change your video effect
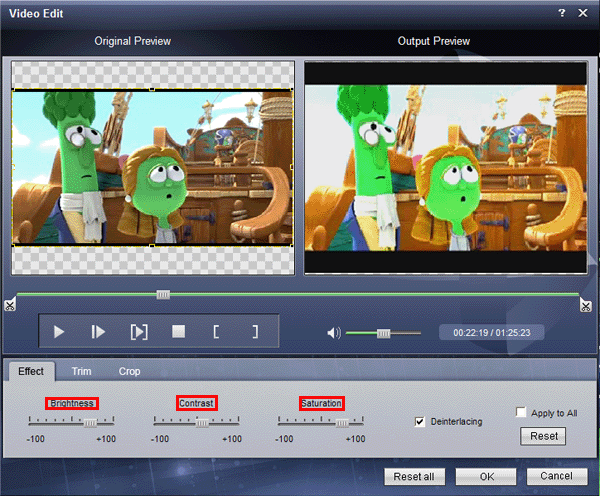
If you want to adjust the effect of your movie, please click the “Effect” button and a pop-up effect window will appear. It allows you to edit your movie’s effect including “Brightness, Contrast, Saturation and Volume”.
2: How to crop off the black edges and adjust the size of video play region
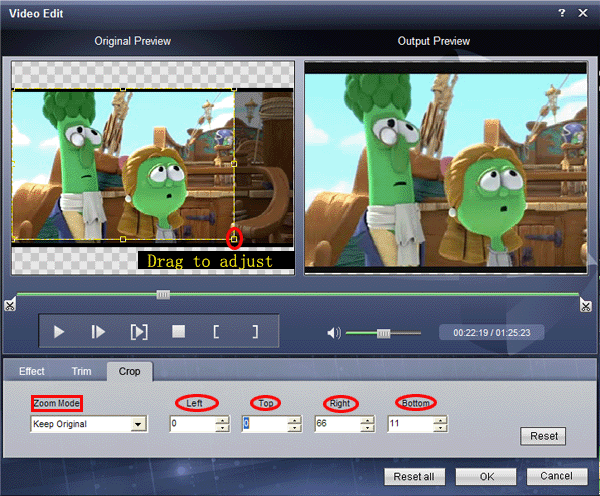
By using the "Crop" function you can crop off the black edge of your video and you can also drag the line around the video image to adjust the video play region to fit for your mobile devices
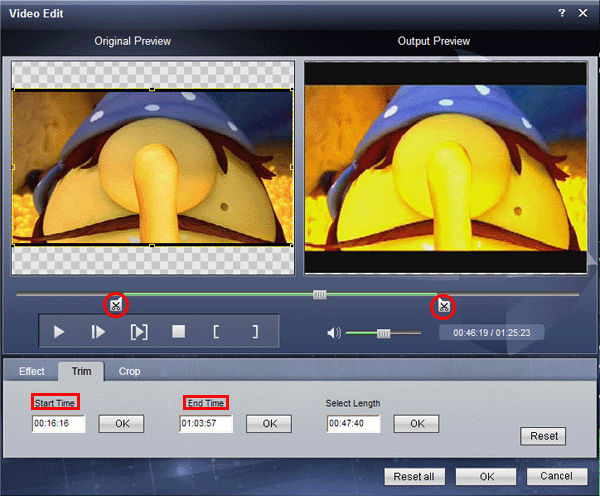
3: How to split your video
The "Trim" function also servers as a video splitter for you to get any time-length video episode. You can set the "Start Time" and "End Time" to set the exact time-length of the clip or you can directly drag the slide bar to the position you want.
4: How to join the videos
If you would like to put several files into one output file, please tick the check box of the “Merge into one file”.
5: How to save your favorite picture
If you like the current image when preview video, you can use the "Snapshot" option. Just click the "Snapshot" button, the image will be saved and you can click the "Open" button next to "Snapshot" button to open your picture.
PS:
For other phone users to enjoy videos:
Sony XPERIA Video Converter
Google Video Converter
BlackBerry Video Converter
Palm Video Converter
|
|
|
|
|
|
   |
    |
 |
wts30286
Joined: 06 Nov 2012
Posts: 45130


|
|
| |
    |
 |
jiuer7845
Joined: 01 Apr 2022
Posts: 161


|
|
| |
     |
 |
Tech Guy
Joined: 10 Jul 2022
Posts: 8


|
|
Need to restore Trash Mac?
Emptying the trash on your Mac only to find out something was deleted that shouldn't have been can seem like a devastating event. However, the files residing in trash may be restored if right actions are taken immediately. When trash is deleted on a Macintosh, the operating system only removes the location of those files from the address table. The data still resides on the hard drive and sits idly waiting to be overwritten.
If you quickly take the necessary steps to retrieve removed trash, these items are easily recoverable. Stellar Macintosh Data Retrieval may be used to locate specified or all deleted files on the hard drive. This utility scans the volume where the files reside and is able to restore the entire volume, selected folders, certain file types, or individual files. The sooner you use this program to recover trash on a Macintosh, the less the danger of overwritten data. Simply follow these steps:
1. Select the volume to be scanned.
2. Choose a method for retrieval.
3. Complete the scan.
4. Locate and select the trash items to be restored.
5. Recover the files.
|
|
|
|
|
|
| |
    |
 |
|
|
|
View next topic
View previous topic
You cannot post new topics in this forum
You cannot reply to topics in this forum
You cannot edit your posts in this forum
You cannot delete your posts in this forum
You cannot vote in polls in this forum
You cannot attach files in this forum
You cannot download files in this forum
|
|
|
|