lucy198754
Age: 42
Joined: 08 Dec 2011
Posts: 304
Location: USA


|
|

If you’ve been one of the PS3 users, you could find that PS3 is not only a game console but also an excellent video player for you. Ever thought of turning your PS3 as your personal portable media player and transfer movies to PS3 for enjoyment freely? In fact, most of the PS3 users have given it a whirl, but frustratingly some PS3 users meet some trouble when they intend to stream/copy video/movie files more than 4GB to PS3. In this page, we will offer you the easy solution.
Solution one: Transfer to PC and then stream videos/movies to PS3 via TVersity without file size limitation.
TVersity Media Server is a software package that allows a personal computer to stream content to UPnP devices, such as the Xbox 360, PlayStation 3, and Wii, regardless of the limitations of the device. For example, the Xbox 360 does not support most codecs. TVersity Media Server transcodes the video on the PC into a compatible codec and then streams it to the device.
Before start streaming, you need to download and install the best TVersity on your PC.
To stream files to your PS3, you need to share them first.
To share one file at a time:
1. Click on Library
2. Click File System and then click Files.
3. Click Add Item and a new window will show up.
4. Click Browse and select the file you want to Share.
5. Click Submit and the file will show up in the list.
To share a folder:
1. Click on Library
2. Click File System and then click Folders.
3. Click Add Item and a new window will show up.
4. Click Browse and select the folder you want to share.
5. Click Submit and the folder will show up in the list.
Watch shared videos on the PS3
To watch the shared videos on the PS3, you have to enable the Media Server Connection feature. To do this, follow the instructions bellow:
1. Get on the PS3 and select Settings.
2. Scroll down to the bottom and select Network Settings.
3. Select Media Server Connection and click Enable.
The PS3 should now find the TVersity you have running on your computer. Here it shows as “DrE-Vista-New: TVersit Media Server” under the Video menu on the PS3. Yours will be a different name.
4. Go to Video and select the Media Server.
5. Navigate through the folders until you find the video you’re sharing.
6. Select the video and it should start playing.
7. Congratulations, you got your own media server.
Solution two: Split/Trim movie/video files over 4GB for PS3.
To make the video/movie more than 4GB play perfectly on PS3, you have to split/trim video/movie files over 4GB for PS3 in advance and then copy trimmed movie/video files to PS3 with an External Hard Drive. Here we highly recommend Brorsoft Blu-ray Video Converter for PS3 to you(You can free download the trail version).
Step 1: Import video/movie files to the best Blu-ray Video Converter for PS3.
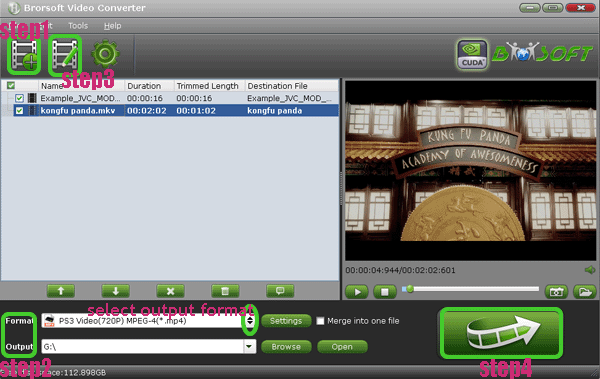
Free download the best Blu-ray Video Converter for PS3 and launch it. Click the button “File”, and from the sublist, click “Load from disc” to load your Blu-ray/DVD movies; click “Add video” to import videos to the best Blu-ray Video Converter for PS3.
Tip: Freely select the subtitles for you Blu-ray/DVD movies from the “Subtitles” option for playing Blu-ray/DVD movie on PS3 with your preferred subtitles.
Step 2: Select an output format for PS3 and set the output folder as you need.
Click on the dropdown menu of “Format” and then move your pointer to “Common Video”. From the sublist, the H.264, MPEG-4, AVI, WMV formats are compatible with PS3. Of course, you can also choose the output format from “PSP/PS3”. From the sublist, the “PS3 Video(AC3 5.1)(*.avi)”, “PS3 Video(480P) MPEG-4(*.mp4)”, “PS3 Video(720P) MPEG-4(*.mp4)”, “PS3 Video(1080P) MPEG-4(*.mp4)” are all the friendly formats for you to copy videos/movies to PS3 for enjoyment.
Step 3: Trim the videos/movies more than 4GB to smaller files for PS3.
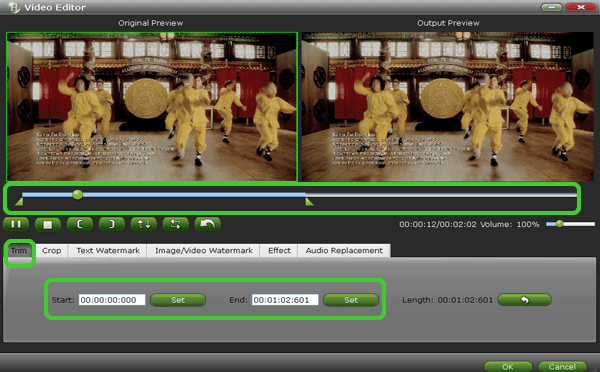
Click the Edit function and you will go into the “Video Editor” windows. In the interface, click the “Trim” icon, and then trim your videos/movies. Usually, you can trim your videos/movies into two parts. Do as following:
Set the Start time as 00:00:00:000, and then set the End time at the half time of the movie/video above for example 01:00:00:000.

Step 4: Start converting your videos/movies to PS3.
Click the “Convert” button; it will convert/trim videos/movies to PS3 immediately with the CUDA acceleration technology support. You can find the process in the “Conversion” interface. After the conversion, you will be able to get the first movie/video part for PS3 via clicking on “Open” button effortlessly.

Now repeat the step 3, but this time you should set the Start time as 01:00:00:000 which is the End time you just set in the above step 3, and then set the End time as the whole movie/video time for example 02:06:10:130. Afterwards, click the “Convert” button; it will start converting and trimming. After the conversion, you can get the other second part of the video/movie. Now you can copy/tranfer videos/movies more than 4GB to PS3 with an External Hard Drive without any video size restriction.
|
|
|
|
|
|