style197
Age: 39
Joined: 15 Apr 2009
Posts: 352
Location: America


|
|
How to convert TiVo recordings for burning DVD with Nero?
Nero has long been the most respected suite for backing up files and creating all types of discs. It is well deserved the title of best burning software on Windows platform for its powerful authoring and burning facilities and excellent support for extensive video and audio formats. Actually Nero handles overwhelming popular video and audio formats, even the AVCHD m2ts footage can be directly imported to the suite without decoding. Nevertheless, there are some video formats that Nero does not work with. And the *.tivo format happens to be one of them. TiVo is very helpful; with the small box we can record any program and shows when we’re at work, and enjoy them whenever we want. The latest 4th generation can store up to 150 hours of HD content (TiVo Premiere XL). But even sooo much space can be used up. When you run out of storage, it is hard to decide which recordings to remain and which to delete. I usually burn the TiVo recordings to DVD before delete them. And I use Nero 9 to author the TiVo shows. Want to know why I manage to load the TiVo files to Nero? Well, I take Pavtube Video Converter.
The Pavtube Video Converter is able to convert TiVo files to AVI, VOB, MP4, WMV, MKV, DV, whatever. To retain original HD quality, you can ‘Directly Copy’ TiVo shows to MPEG files; to save storage, you can shrink the TiVo recordings; to burn CD album, you can extract audios from TiVo files; to cut the commercials, you can ‘trim’ the ads out; to eliminate the black edges, you can ‘crop’ the image and remain the part you like. And, to conclude, it is worth trying. So why not download the trial version of Pavtube Video Converter and give it a shoot? By the way, the trial version gives videos with a ‘Pavtube’ logo on the screen.
Now let’s focus on the process of converting TiVo shows to Nero.
1. Transfer TiVo recordings to PC (or laptop)
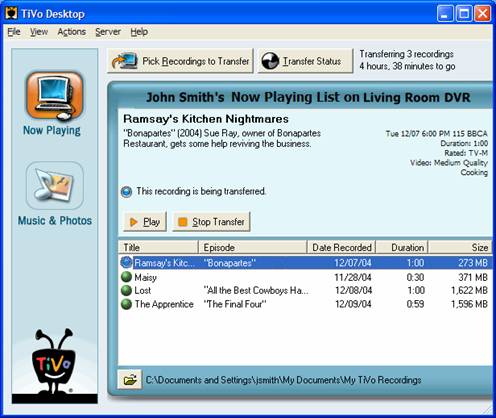
Transferring TiVo recordings to PC is easy and straight-forward. All you need is a freeware by TiVo--- the TiVo Desktop (download the latest version v2.8). Connect the TiVo box with your home network, and run TiVo Desktop. Click on “Pick Recordings to Transfer”. Check the box next to the title of the show (or shows) you want to transfer and click on “Start Transfer”. Transfer times vary, but may be as long as the show's duration to complete the transfer.

2. Convert TiVo recordings to Nero.
Step 1. Input Media Access Key.
Launch Pavtube Video Converter, Click on the “Option” button, switch to TiVo tab, and enter your Media Access Key. Click “OK” to confirm.

Step 2: Import TiVo files.
Now click “Add” to import all .tivo files, or you may drag and drop the *.tivo files to the window of Pavtube Video Converter.

Step 3: Select an output format for burning in Nero.
Click on the pull down menu of “Format” to select output format. If you do not want to loss any quality, please select Copy-> Directly Copy. Most of the recordings are HD 1920*1080 videos, which can be burned to blu-ray discs after being converted to TS format (in the row of HD Video). For me, I’d like to compress the HD recordings so as to fit 4.7G DVDs. I used to select Common Video-> Divx AVI, and then click “Settings” button to adjust audio and video parameters. The following picture shows detailed settings:

Note that you’d better change the video “Size” to 960*540 provided your source video is 16:9 and you don't’ want outstretched image.
If you choose “Directly Copy”, the Video Converter will decrypt TiVo files to MPEG-2 encoded format (the TiVo format is actually encrypted MPEG-2 streams), and the “Settings” button is grayed out. Some people may want to keep 5.1 channels for DVD burning. If you choose H.264 MP4, WMV3, MKV, MPEG-2 Video, or MOV-Quick Time, 5.1 channels can be available.
Step 4. Edit the TiVo recordings to keep proper length and size.
Click on “Edit” button to enter editing window of Video Converter.
I. Cut unwanted black edges
Switch to Crop tab to cut unwanted edges. You can crop the video by adjusting the crop frame (drag the green dotted green square frame to circle the part you want to retain) or setting values (Left, Top, Width and Height) of crop area.

II. Trim out bothering commercial ads
Under 'Trim' tab you are allowed to cut out unwanted part of selected clip. To trim the video, simply type in desired time value in ‘Start’ and ‘End’ box and click ‘Set’ button. Or you can click left square bracket and right square bracket to set start and end time when playing the video.
Step 5: Click “Convert” button to start converting TiVo to Nero compatible format.
Back to main interface and click “Convert” button, the TiVo converter will generates videos that are compatible with Nero. After conversion you can click the “Open” button next to output path to find converted recordings. Now you can feel free to run Nero and load them for burning DVDs.
|
|
|
|
|
|