lydia622520
Age: 37
Joined: 07 Mar 2012
Posts: 318
Location: USA


|
|

Have you got a new iPad now? How to make full use of this stunning device to bring you more fun? In addition to playing games and surfing the internet, watching movies on its Retina display at 2048 x 1536 pixels is a good idea. Ever thought of getting more movies to your new iPad not only those in your iTunes library? Here we offer you some tips of how to use home sharing on your new iPad in order to stream movies, music from multiple computers.
Guide: Stream movies, music to the new iPad from multiple computers with home sharing
Before iOS 4.3, Home Sharing was only for PCs, but now you can share any computer's iTunes library with your new iPad, iPhone 4S, or iPod Touch 4 over your Wi-Fi network. This allows you to access more music, movies, or podcasts from multiple computers without burdening your device's storage. Once you set up your Home Sharing account on your computers and devices, sharing is easy. Here's how to do it:
A: Set up your Home Sharing account
1. Download and run iTunes 10.6 on your computer.
2. Go to the "Advanced" menu, select "Turn on Home Sharing".
3. Enter your Apple ID credentials.
4. Now you'll need to do the same on your new iPad.
Go to "Settings," "iPod," and enter the same Apple ID credentials. If you want to access a computer with a different Apple ID association, you'll have to enter that one instead.
Note: iTunes limits users to five computers per Home Sharing account, so if you've reached your limit (as Apple will tell you), deauthorize one of the computers. To do so, go to iTunes, head to the "Store" menu, and then "Deauthorize this computer."
B: Home Sharing on the new iPad
5. Make sure your new iPad and computer are on the same Wi-Fi network.
6. After that, go into the iPod app itself and then tap the "More" tab on the bottom. There will be a house icon toward the bottom of the list that says "Shared" next to it.
7. When you tap on Shared, the app will show you however many libraries it can find on your local network that are using your Apple ID. In my case, there are actually a few different computers that fit this description, but today there's just one.
8. Once you select the computer that you want to stream from, the new iPad will load up that machine's library and display its name across the top of your screen.
9. Now you can then navigate through the library just as you would if you were navigating the synced music, video on your new iPad.
Additionally, the Home Sharing feature even works when you try to stream ripped video content that you've imported into your iTunes library which are not purchased from iTunes. While, if you are looking to stream/sync AVI, WMV, MKV, MTS, FLV, etc to the new iPad that aren't supported by iTunes, you have to convert these video files to the iTunes and the new iPad supported video format first.
In that case, a professional and easy-to-use video convert tool is necessary. Here we recommend you the best Video Converter for the new iPad. This Video Converter for the new iPad is the best application for you to convert any common video like VOB, MOD, TiVo, FLV, WMV, MKV, etc to the new iPad friendly format at super fast speed with high output quality. What’s more, this program comes with preset profiles for the new iPad 3 that means you no longer need to adjust the video and audio parameters for your video manually and get a high-quality video effortlessly.
PS: If you are Mac users, this Mac Video Converter for the new iPad will be your best choice which aid you to convert any video files to the new iPad video format MP4 on Mac quickly and easily.
Guide: Convert/Sync video to the new iPad with the best Video Converter for the new iPad.
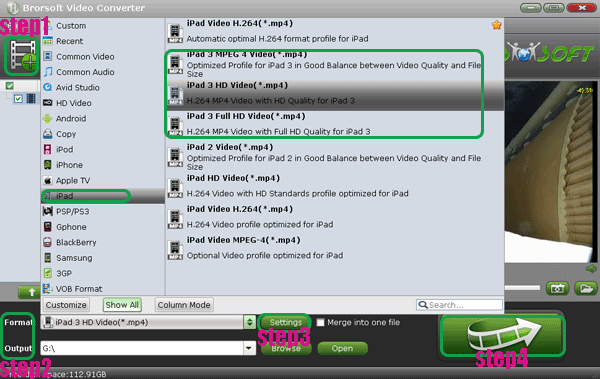
Step 1: Import video files to the best Video Converter for the new iPad.
Launch the best Video Converter for the new iPad. Click the button “File” to add video files to it.
Tip: If you have several video files and wanna combine several video files for the new iPad, you just need to tick off the “Merge into one” box.
Step 2: Select an output format for the new iPad and set the output folder.
Click on the dropdown menu of Format> iPad, iPad 3 Full HD Video(*.mp4), iPad 3 HD Video(*.mp4), iPad 3 MPEG 4 Video(*.mp4) are all compatible. Or you can choose the Common video>H.264 Video(*.mp4). Now, you can set the output folder.
Step 3: Click “Settings” icon to adjust audio and video parameters for the new iPad.
Click the “Settings” icon, and you can adjust codec, bit rate, frame rate, sample rate and audio channel in the interface to optimize the output file quality.
Note: You can set the video size as 1920*1080 if your source video is in 1080p.
Step 4: Start converting your video files to MP4 for the new iPad.
Click the “Convert” button; it will convert video to MP4 for the new iPad immediately. You can find the process in the “Conversion” interface.

After the short conversion, you ill be able to get the output files for the new iPad via clicking on “Open” button effortlessly. Now, you can transfer video to the new iPad via iTunes with home sharing feature freely.
Tip:
If you are the old iPad or iPad user and wanna transfer the information from them to the new iPad, you can refer to Transfer data/information to the new iPad from old iPad/iPad 2 to get some information.
|
|
|
|
|
|