style197
Age: 39
Joined: 15 Apr 2009
Posts: 352
Location: America


|
|
JVC camcorder users are usually troubled by MOD and TOD files that generated by their JVC camcorders, because the two formats generally can not be accepted directly by most video players or editors. If you want to enjoy these video files on your computer or portable devices, or even do some further editing with video editing software, you have to convert them to some other common formats previously. This article here will introduce you how to convert MOD and TOD files generated by JVC camcorders on Windows and Mac?If you are in need, please go ahead with it.
Part 1: About MOD and TOD:
Both MOD and TOD are the informal tapeless video formats produced by certain digital camcorders. And both of them have never been given to any meaning explanations or official names by their creators JVC or Panasonic. The differences between them lie in: MOD are used by JVC, Panasonic, and Canon in some models of camcorders, such as JVC GZ-MG130, GZ-MS100U, GZ-MG255, Panasonic SDR-SW20, SDR-SW21, SDR-S26, Canon FS100, FS200, FS21 and so on, while TOD is only used by JVC camcorders, like JVC GZ-HD7, GZ-HD5, GZ-HD6, GZ-HD30, and GZ-HD40; Moreover, MOD is only used for standard definition video files, while TOD is exclusively used for high definition video files.
Part 2: How to convert MOD and TOD files on Windows?
Step 1: Download, install and run Pavtube TOD Converter
Step 2: Import video files, select output format and specify store path
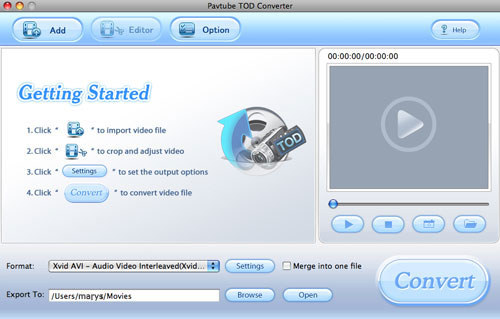
Add your recorded MOD or TOD files to this program, and select whatever formats you need from the drop-down list of “Format”. If you want to play on your cell phone, you can select 3GP; to play on iPod or iPhone, you can select MP4; to share online, you can select FLV. Meanwhile, press output folder to specify where to locate the output files, or you can use the store path set by default. Further more, suppose you need to join several files to be one, you can check “Merge into one file” to realize it.

Step 3: Set advanced settings:
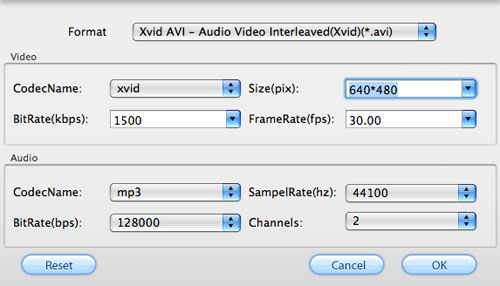
You are allowed to do some advanced settings according to your own requirements. In this section, you are able to set parameters for output video, the bigger value, the better quality, but the larger size.

Step 4: Convert
Pavtube provides you a friendly interface while converting, and all the conversion info can be found out in the following window, like total progress, the time have spent, the file size have been generated, as well as the possible left time and the entire size probably produced during the conversion.

Tips:
1. The converting speed of this software is 1-2 times faster than the similar converters. Batch conversion can be done in a few minutes. Merge multiple files into one file is also available.
2. It does not have the audio-video sync issues.
3. With exception of adding text as watermark, images, GIF animations, and videos can also be added as watermarks to realize the picture-in-picture effect.
4. You can use the “Trim” function to select certain video clips to convert. And you can also take advantage of the “Crop” function to remove black edges or change the screen size.
Part 3: How to convert MOD and TOD files on Mac?
Step 1: Download, install and run Pavtube TOD Converter for Mac.

Step 2: Select formats and do advanced settings
Add your recorded MOD or TOD files to it, and select whatever formats you need from the drop-down list of “Format”. If you want to edit with iMovie, you can select MOV or MP4; to play on your cell phone, you can select 3GP; to play on iPod or iPhone, you can select MP4; to share online, you can select FLV.
Meanwhile, you are allowed to do some advanced settings according to your own requirements. For instance, you can reset the screen size or change the bit rate. Increase the bit rate, video quality will be improved, while file size will be enlarged. Decrease the bit rate, file size will be reduced, while quality is inferior to the original.

Step 3: Export To
Set which destination folder the output files will be exported to. You can export them to the default path or specify a path to locate them by clicking “Browse”.
Step 4: Convert
Tips: Introduce you two more special functions to optimize your conversion.
Suppose to add logos or images on your videos to show your personalized settings or to reserve your own copyright? The following step will show you the methods of adding watermarks.
1. Add watermarks to your video
There are four ways to add watermarks, including adding text, adding images, adding GIF animations, and especially adding videos. Don’t you think a picture-in-picture function is really wonderful?

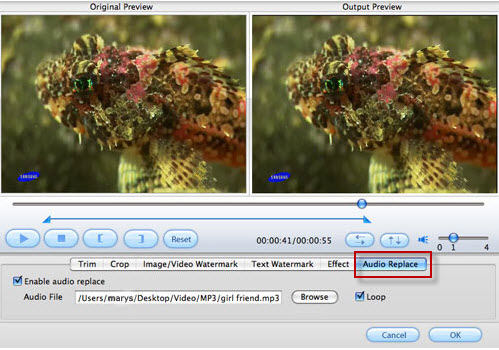
2. Audio Replace
If you want to add some soft music or some other audio resources to match your recorded videos, you can have a try about the function of “Audio Replace” to replace the original audio in your videos. You can click “Browse” to select which audio resources will be used to take place of the original audio.

Hope this article could definitely relieve your format troubles while handling MOD or TOD video files no matter you are a Windows user or a Mac user.
|
|
|
|
|
|