| |
| Author |
Message |
harvey438
Joined: 02 Jun 2009
Posts: 127


|
|
How to convert TOD/MOD from JVC Camcorder to MP4, AVI, MOV, etc. on Mac OS X?
Pavtube TOD Converter for Mac: http://www.pavtube.com/tod-converter-mac/
Do you have a JVC camcorder? If the answer is yea-saying, you must be familiar with the MOD and TOD files. However, I also suppose that you must have encountered some troubles caused by the two formats more or less. This article will tell you what are MOD and TOD, and how to convert MOD and TOD files generated by JVC camcorders on Mac.
Below are its main 4 parts and I am going to demenstrate it.
Part 1: What are MOD and TOD formats
Part 2: The difference between MOD and TOD
Part 3: How to convert MOD or TOD to common video files on Mac OS for further enjoyment on iPod, iPhone, PSP, etc.
Part 1: What are MOD and TOD formats
In order to meet people’s different kinds of requirements in video recording, camcorder manufacturers have developed numerous types of camcorders. However, the recorded formats produced by these camcorders are various and special, and are not widely accepted by Mac or most portable devices we often use in daily life; therefore, these formats usually bring some troubles to camcorder users, MOD and TOD are the two formats among them.
Both MOD and TOD are the informal tapeless video formats produced by certain digital camcorders. And both of them have never been given to any meaning explanations or official names by their creators JVC or Panasonic.
Part 2: The difference between MOD and TOD
1、MOD are used by JVC, Panasonic, and Canon in some models of camcorders, such as JVC GZ-MG130, GZ-MS100U, GZ-MG255, Panasonic SDR-SW20, SDR-SW21, SDR-S26, Canon FS100, FS200, FS21 and so on, while TOD is only used by JVC camcorders, like JVC GZ-HD7, GZ-HD5, GZ-HD6, GZ-HD30, and GZ-HD40
2、MOD is only used for standard definition video files, while TOD is exclusively used for high definition video files.
Part 3: How to convert MOD or TOD to AVI, MPEG, WMV, MOV, 3GP, MP4, FLV, etc. on Mac OS for further enjoyment on iPod, iPhone, PSP, etc.
Pavtube TOD Converter for Mac will be introduced to help you convert MOD and TOD files generated by JVC camcorders on Mac. With the converted videos, you are able to playback on portable devices like iPod, iPhone, PSP, etc; edit with iMovie; upload online for sharing; and so forth. Now let’s start.
Step 1: Download, install and run Pavtube TOD Converter for Mac.
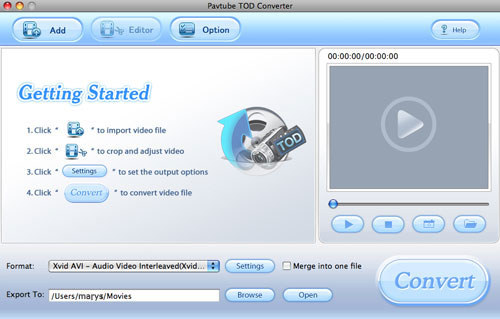
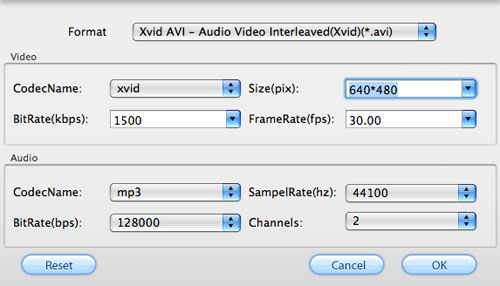
Step 2: Select formats and do advanced settings
Add your recorded MOD or TOD files to it, and select whatever formats you need from the drop-down list of “Format”. If you want to edit with iMovie, you can select MOV or MP4; to play on your cell phone, you can select 3GP; to play on iPod or iPhone, you can select MP4; to share online, you can select FLV.
Meanwhile, you are allowed to do some advanced settings according to your own requirements. For instance, you can reset the screen size or change the bit rate. Increase the bit rate, video quality will be improved, while file size will be enlarged. Decrease the bit rate, file size will be reduced, while quality is inferior to the original.
Step 3: Export To
Set which destination folder the output files will be exported to. You can export them to the default path or specify a path to locate them by clicking “Browse”.
Step 3: Convert
Click “Convert” button at the right bottom of the main interface to start converting.
Once you have finished these editing and converting jobs, you can deal with the resulted videos with ease: Export MP4 or MOV files to iMovie to do further editing, or export 3GP files to your cell phone for playback, or export AVI or MPEG files to PPT to vivify your presentation, or export MP4 files to play on your iPod or iPhone, or export FLV files to upload to video websites to share with others, all in all, you can do whatever you like with them.
Tips:
1. The converting speed of this software is 1-2 times faster than the similar converters. Batch conversion can be done in a few minutes. Merge multiple files into one file is also available.
2. It does not have the audio-video sync issues.
3. With exception of adding text as watermark, images, GIF animations, and videos can also be added as watermarks to realize the picture-in-picture effect.
4. You can use the “Trim” function to select certain video clips to convert. And you can also take advantage of the “Crop” function to remove black edges or change the screen size.
5. Specific effect models are provided, such as “Simple gauss blur”, “Simple laplacian sharpen”, “Aged film”, “Flip color”, and “Invert”.
|
|
|
|
|
|
| |
    |
 |
informationspy
Joined: 09 Jun 2008
Posts: 246


|
|
"How to convert video files using this video converter? The following will show you a step by step guide to complete the conversion task. First, download Xilisoft Video Converter Ultimate.
Step 1: Install and run the software
After installing and running the software, you will see the main interface as below.
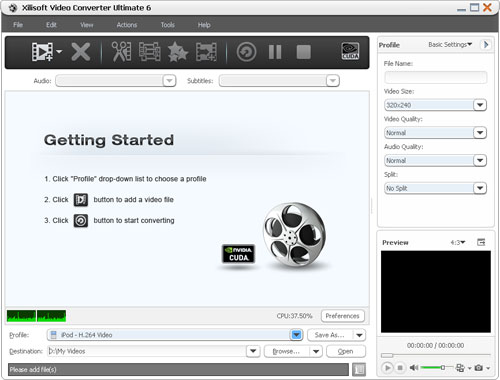
Step 2: Add File
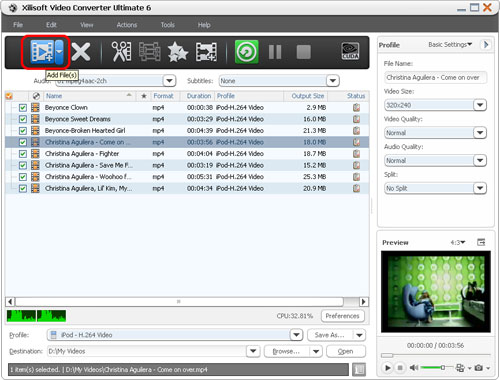
Click ""Add File"" button on the toolbar or ""File> Add File"" to load files.
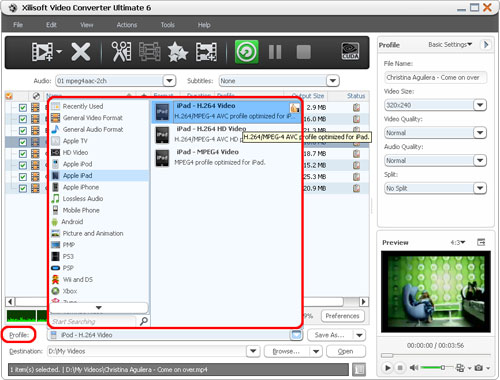
Step 3: Choose output format
Choose the file, click ""Profile"" drop-down button to choose the formats you need, then click ""Browse"" button to choose destination folder for saving output files.
 [ [
Tip1: We provide abundant profiles sorted by various popular devices, especially all-around HD video formats are supported.
Tip2: Many options for you to choose. The ""Recent"" option will record your recent using automatically and it is convenient to be used afterward.
Tip3: If you want to do more with your video and audio files, please refer to the ""More usage skills"".
Step 4: Convert
After choosing the format, you only need to click ""Convert"" button on the toolbar to complete the task.
Ok, the above is the simplest function for your conversion. We provide you more abundant skills below!
More usage skills
1. Clip video segment
At first, choose the video file you want to clip. Then click ""clip"" button on the toolbar and you can set the start & end point to get the partial segment. And Checking the ""Output segments as whole one"" option will merge the segments in the list into one file, then click ""Move Up"" or ""Move Down"" button to choose the sequence of the segments.
2. Append effect
Below is the effect of source video and let us edit it step by step now.
First, choose the video you want to edit, and then click ""Effect"" button on the toolbar. You will see the edit window below.
* Crop the size of video
Check ""Enable Crop"", set ""Crop Area Size"" to adjust the height and width of the crop area.
* Add effect to video
Check ""Enable Effect"", choose an effect for the output video from the ""Other Effects"" drop-down list.
* Add watermark to video
Check ""Enable Watermark"", and click ""Add Text Watermark"" or ""Add Picture Watermark"" to add watermark for the video, then adjust the transparence, position and font style of the watermark.
* Add and adjust subtitle for video
Check ""Enable Subtitle"", and click the ""Browse"" button below ""Subtitle"" to add a subtitle file for the video, then adjust the transparence, position and font style of the subtitle in the option to get a video with the subtitle you add.
* Comparison
Click ""Comparing Preview"" button at the right bottom of comparing window to compare the ultimate effect.
Tip: There are still many parameters for you to use, if you want to append more unique effect.
3. Merge any video into the whole one
Choose the video file and click ""Merge"" button on the toolbar to merge any video file you want to unite, and output them as the whole one.
4. Add profiles for the same video file
Select the video and click the ""Add Profile"" to set multiple output formats for one files simultaneity, and you can get several video formats for your different players.
5. Gain exact video file size using bitrate calculator
To custom output size, select the video file and click Tools >Bitrate Calculator, and input the file size to get exact video file.
6. Divers parameters for you to choose
for more information take the reference here :
http://www.xilisoft.com/video-converter.html
"
|
|
|
|
_________________
One lies makes many!
|
|
| |
     |
 |
harvey438
Joined: 02 Jun 2009
Posts: 127


|
|
This MOD Converter for Mac is an ideal tool for JVC MOD Camcorder users to edit and convert MOD videos on Mac OS. Its powerful edit functionalities allows you to personalize the recording video MOD from your digit camcorder in the way you like, and then output other popular video and audio formats like MP4, 3GP, AVI, MPG, MPEG-4, FLV, MOV, 3G2, VOB, MP3, FLAC, MKA, OGG, WAV, AC3, M4A etc.
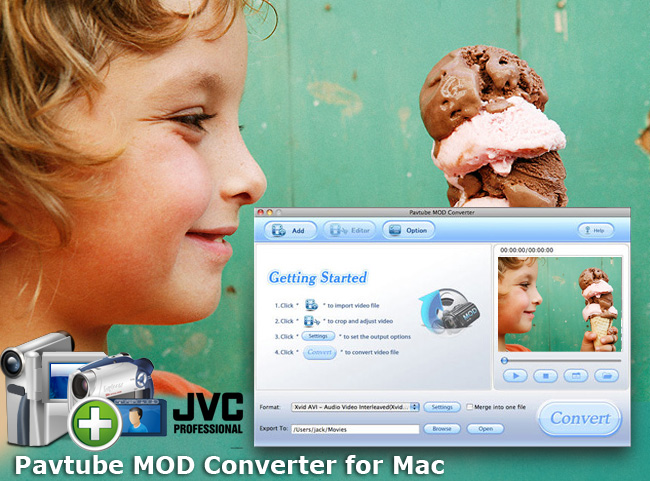
Key Features
1 、Easy to use interface
You will be expert when using the MOD tool since its easy-to-use intuitive interface allows you to find any options you need.

2、Faster conversion speed
This program optimized its conversion speed, so that you can convert the MOD in less time
3、Simple gauss blur effect
Simple gauss blur effect is very useful to recorded file formats, since it can eliminate the recorded videos noise. The program allows you to add the effect, as well as other special effects like simple laplacian sharpen, gray, flip color, invert, aged film and deinterlacing.

4、Accurate trim the special length of MOD video
The trim function allows you to get the special length of MOD video accurately since its inner seek function can get the capture any key frame of the MOD.
5、Crop MOD clips
You can cut off the black edges and unwanted MOD video area easily
6、Merge multiple videos and replace original audio

You can join multiple videos into one bigger file for conversion, as well as replace the original audio with other sounds you like.
7、Add text, image, and video watermark
This program supports to add different watermark types, including text, image, and video watermark to the MOD. What is worth mentioning is that the program also supports to add GIF image as a watermark, which can not be realized by other competitors.
8、Capture the snapshot images
You can capture the snapshots images as your wallpaper or editing elements if you like.
9、Audio and video sync technology
The MOD Converter for Mac adopted advanced audio and video sync technology; never let you troubled by the audio and video issues.

10、Built-in codec
Its built-in codec will guarantee you a more stable computer codec environment, so as to less the unexpected codec problem.
|
|
|
|
|
|
| |
    |
 |
ivy00135

Joined: 06 Nov 2012
Posts: 49808


|
|
| |
    |
 |
|
|
|
View next topic
View previous topic
You cannot post new topics in this forum
You cannot reply to topics in this forum
You cannot edit your posts in this forum
You cannot delete your posts in this forum
You cannot vote in polls in this forum
You cannot attach files in this forum
You cannot download files in this forum
|
|
|
|