| |
| Author |
Message |
karen1214
Age: 37
Joined: 04 Mar 2009
Posts: 119


|
|
Mac HD coverter,convert HD(TS,TP,TRP,MTS,M2TS,etc.) on Mac!
Q1:What is HD format and HD video?
HD means High Definition. High Definition Video format is being described as HD format. High-definition (HD) video generally refers to any video system of higher resolution than standard-definition (SD) video, most commonly at display resolutions of 1280×720 (720p) or 1920×1080 (1080i or 1080p). MPEG - 2 and MPEG - 4 are such compressed formats, for normal quality recordings. TS, TP, TRP, M2TS, and MTS etc. belong to HD format.
Q2:How to convert HD movies(TS,TP,TRP,MTS,M2TS etc.) forportable devices (iPod, iPhone, PSP.) or multimedia players such as QuickTime on Mac?
The professional HD Video Converter for Mac provides you with the perfect solution.It can convert HD videos (TS,TP,TRP,MTS,M2TS etc.) to various video formats such as AVI, FLV, WMV, TS, MP4 (Sony PSP, Apple TV, iPod, iPhone, BlackBerry, iMovie, iDVD, iTunes, etc), 3GP, 3GP2, 3GPP, 3GPP2, QuickTime (MOV), MPG, M4V, ASF, MKV, F4V, VOB, DV.
1)Install Video Converter for Mac
Free download and run Video Converter for Mac. Click the “ADD FILES” button to load your HD videos (TS,TP,TRP,MTS,M2TS etc.).

2)select Output Formats:
Click the drop down list and select the output format you want, such as Mp4, Mov, AVI etc. Here I take AVI as an example. (You could also choose the one according to your mobile devices).

3) Start conversation
Click “CONVERT” and start the conversation! And after finishing, you could put the video to your mobile devices and enjoy them anytime and anywhere.
Optional: Edit function
Besides the convert video formats, this Video Converter for Mac has powerful edit function, such as crop, trim and effect.
Free download and try now HD Video Converter for Mac
Burn HD videos to DVD with DVD Creator for Mac
|
|
|
|
|
|
   |
    |
 |
scofield119
Joined: 13 Jun 2008
Posts: 139


|
|
"How to convert video files using this video converter? The following will show you a step by step guide to complete the conversion task. First, download Xilisoft Video Converter Ultimate.
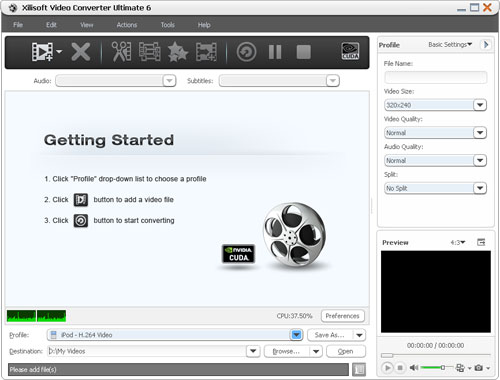
Step 1: Install and run the software
After installing and running the software, you will see the main interface as below.

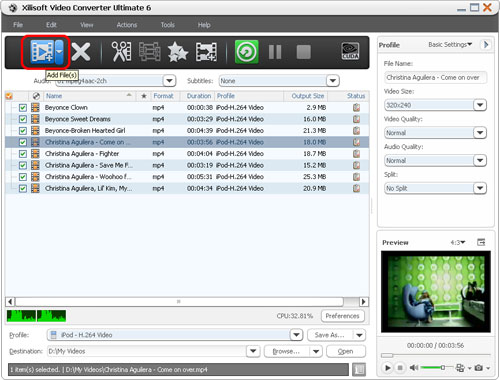
Step 2: Add File
Click ""Add File"" button on the toolbar or ""File> Add File"" to load files.
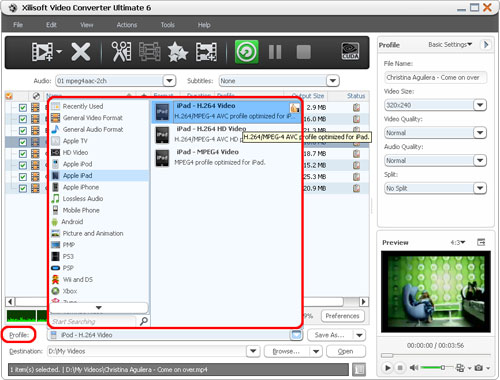
Step 3: Choose output format
Choose the file, click ""Profile"" drop-down button to choose the formats you need, then click ""Browse"" button to choose destination folder for saving output files.
 [ [
Tip1: We provide abundant profiles sorted by various popular devices, especially all-around HD video formats are supported.
Tip2: Many options for you to choose. The ""Recent"" option will record your recent using automatically and it is convenient to be used afterward.
Tip3: If you want to do more with your video and audio files, please refer to the ""More usage skills"".
Step 4: Convert
After choosing the format, you only need to click ""Convert"" button on the toolbar to complete the task.

Ok, the above is the simplest function for your conversion. We provide you more abundant skills below!
More usage skills
1. Clip video segment
At first, choose the video file you want to clip. Then click ""clip"" button on the toolbar and you can set the start & end point to get the partial segment. And Checking the ""Output segments as whole one"" option will merge the segments in the list into one file, then click ""Move Up"" or ""Move Down"" button to choose the sequence of the segments.
2. Append effect
Below is the effect of source video and let us edit it step by step now.
First, choose the video you want to edit, and then click ""Effect"" button on the toolbar. You will see the edit window below.
* Crop the size of video
Check ""Enable Crop"", set ""Crop Area Size"" to adjust the height and width of the crop area.
* Add effect to video
Check ""Enable Effect"", choose an effect for the output video from the ""Other Effects"" drop-down list.
* Add watermark to video
Check ""Enable Watermark"", and click ""Add Text Watermark"" or ""Add Picture Watermark"" to add watermark for the video, then adjust the transparence, position and font style of the watermark.
* Add and adjust subtitle for video
Check ""Enable Subtitle"", and click the ""Browse"" button below ""Subtitle"" to add a subtitle file for the video, then adjust the transparence, position and font style of the subtitle in the option to get a video with the subtitle you add.
* Comparison
Click ""Comparing Preview"" button at the right bottom of comparing window to compare the ultimate effect.
Tip: There are still many parameters for you to use, if you want to append more unique effect.
3. Merge any video into the whole one
Choose the video file and click ""Merge"" button on the toolbar to merge any video file you want to unite, and output them as the whole one.
4. Add profiles for the same video file
Select the video and click the ""Add Profile"" to set multiple output formats for one files simultaneity, and you can get several video formats for your different players.
5. Gain exact video file size using bitrate calculator
To custom output size, select the video file and click Tools >Bitrate Calculator, and input the file size to get exact video file.
6. Divers parameters for you to choose
for more information take the reference here :
http://www.xilisoft.com/video-converter.html
"
|
|
|
|
_________________
A wanderer who is determined to reach his destination does not fear the rain.
|
|
| |
    |
 |
ivy00135

Joined: 06 Nov 2012
Posts: 49808


|
|
| |
    |
 |
|
|
|
View next topic
View previous topic
You cannot post new topics in this forum
You cannot reply to topics in this forum
You cannot edit your posts in this forum
You cannot delete your posts in this forum
You cannot vote in polls in this forum
You cannot attach files in this forum
You cannot download files in this forum
|
|
|
|