| |
| Author |
Message |
ejheping
Age: 39
Joined: 15 May 2009
Posts: 12
Location: Victorian


|
|
You may have the need to do some editing on your DVD movie and convert them with the customized editing to AVI, MPEG, WMV and 3GP video. This will be very interesting, since you are creating kind of new movie all by yourself.
To edit the DVD video, you need to find a DVD decrypting application, or DVD ripping software which provides editing options as much as possible. I am using Pavtube DVD Ripper, so, today, I just take Pavtube DVD Ripper for example.
First, you need to import the DVD movies to the DVD ripping software.
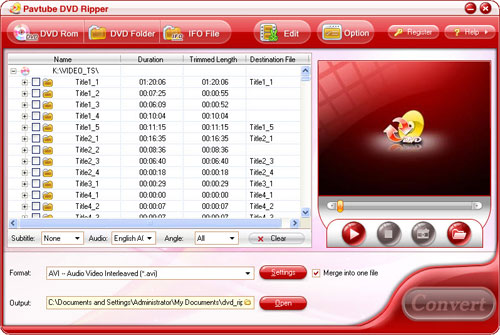
Second, select the titles you would like to do editing and if you don’t know much about the movie you import, click the preview button to make sure that you are editing the right titles or chapters. And the hit the button of “Edit” to adjust the effect, trim or crop the videos.
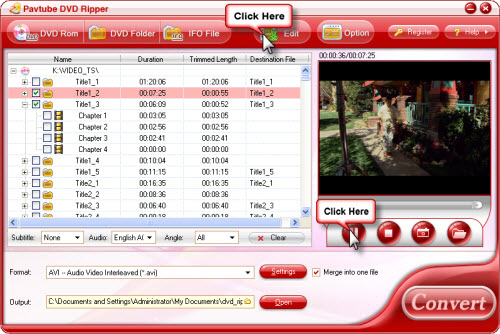
Third, now let’s start the editing. Pavtube DVD Ripper offers three main editing sections, effect setting, trimming and cropping.
Effect Setting: Options are contrast, brightness for video and volume for audio.
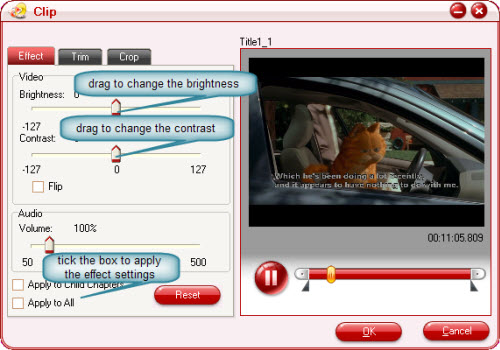
Drag the slider bar for Brightness, Contrast, and Volume to preview the effect on the right column.
If the DVD image does not display correctly, you can tick the checkbox for "Flip" to fix it.
Remember to hit “Apply”. Hit "Apply to Child Chapters" if the file you select is a title, or "Apply to All" if the file you select is a chapter. Otherwise, you may click the "Reset" button to gain the default settings.
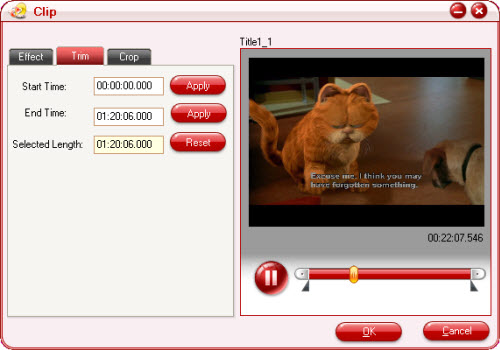
Trim: This is intended for users to define the beginning time as well as ending time. You can trim the section you want through either defining a specific time or an ending time or drag the side bars at the two ends to clip the movie section. The later is much more convenient. Keep in mind that you must hit the button of “Apply” and “OK” or you have spend all the time in vain.
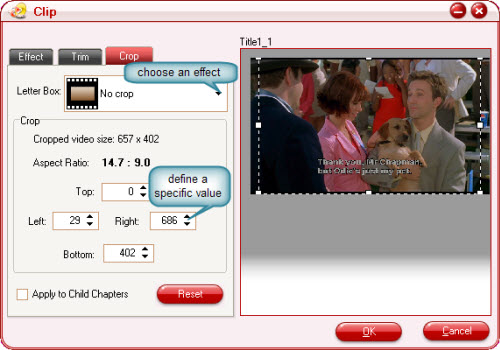
Crop: This is intended for users to crop the image.
Select an option under the drop down list of the "Letter Box", drag the dashed frame on the preview pane, or enter value on the boxes for the four positions to set the pixels you want to cut off. If the file you select to customize is a title, you can tick the checkbox for "Apply to Child Chapters" to get other files with the same settings under the "Crop" tab.
As this guide shows, you can tick several items on the major interface and apply the settings one by one, and in this way, you keep different settings for different titles or chapters, for example, you may have trim first 3 minutes of the Title1_2, the last 30 seconds of the Title1-3 etc.
To combine the sections you have selected and edited, all you need to do is to tick the checkbox of “Merge into one file” next to the format selecting box.

And finally, you will get the videos consisting of your favorite parts and with your preferred settings.
|
|
|
|
|
|
  |
    |
 |
ivy00135

Joined: 06 Nov 2012
Posts: 49808


|
|
| |
    |
 |
|
|
|
View next topic
View previous topic
You cannot post new topics in this forum
You cannot reply to topics in this forum
You cannot edit your posts in this forum
You cannot delete your posts in this forum
You cannot vote in polls in this forum
You cannot attach files in this forum
You cannot download files in this forum
|
|
|
|